Supplies from the Sky: C.L.E. Containers

History and Development

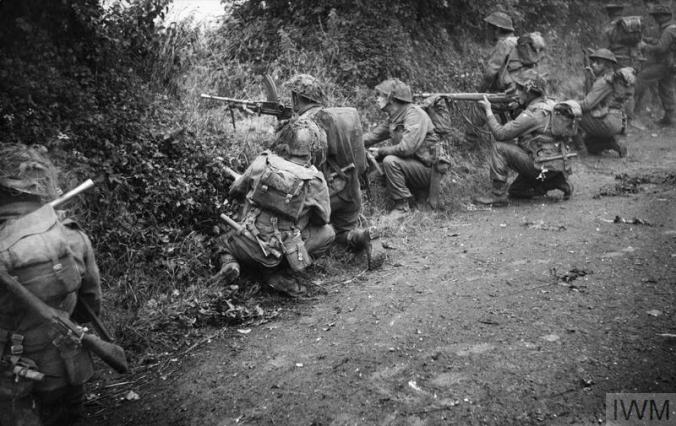
Britain’s Airborne Forces were officially formed on June 22, 1940, when Prime Minister Churchill wrote a memorandum calling for the creation of parachute and glider units.  These new Airborne units were originally similar to the Commandos, tasked with conducting raids in occupied Europe for sabotage, intelligence-gathering, and demoralizing the enemy.  As time went on, the Airborne Forces grew, and their role changed from raiding to capturing and holding key objectives ahead of conventional forces.  The 1st and 6th Airborne Divisions spearheaded the invasions of Sicily and Normandy, in July 1943 and June 1944, respectively.  The advancements in Airborne capabilities in the four years from creation to D-Day were extraordinary.  One of the most important developments was that of providing supplies to the Airborne troops.

Containers Pegasus

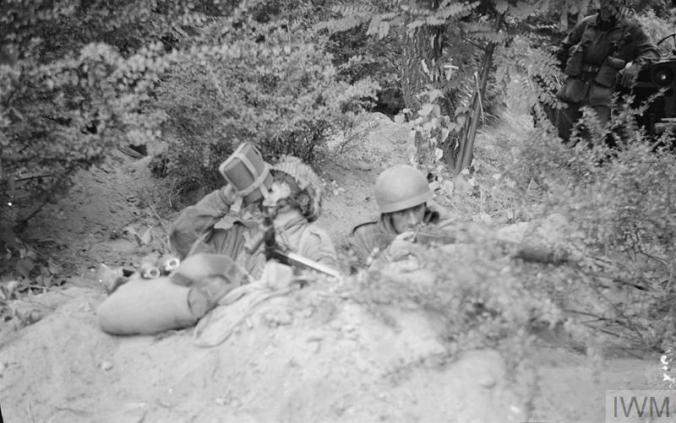
C.L.E. containers and wicker panniers on display at the Memorial Pegasus in Benouville, Normandy.  Author’s photograph.

In early June 1940, the Royal Air Force established the Central Landing School at R.A.F. Ringway in Manchester.  The School was created to train pilots and aircrew in emergency parachuting for escaping crippled aircraft.  After the Prime Minister issued his memorandum in late June, the School found itself tasked with training soldiers in parachuting, and a handful of Army personnel were assigned to Ringway to assist the R.A.F. both with training and administration.

By September 1940, the School was renamed the Central Landing Establishment, or C.L.E.  Eventually, the C.L.E. consisted of three units:  the Parachute School, the Glider Training Squadron, and the Development Unit.  This last unit was given the task of designing specialized equipment to support the new Airborne Forces, with an emphasis on the delivery of supplies.

In those early days, there was little enthusiasm for the Airborne Forces in either Army or R.A.F. senior command.  After all, Hitler threatened to invade Britain, and the military was more concerned with preparing for a known threat than developing a new and experimental form of warfare.  However, the Prime Minister insisted, and the R.A.F., quite reluctantly, transferred a handful of Armstrong Whitworth Whitley bombers to Ringway for parachute and glider training.

The Whitley was chosen as it was becoming obsolete as a front-line bomber because of its limited range and payload.  It was not much better suited for dropping paratroopers.  There was room for ten men to sit rather uncomfortably on the floor of the fuselage; if they were lucky, a few mattresses were provided to provide padding and insulation.  The bomb-bay doors were replaced with a simple hatchway, and the men took turns dropping through the hole.

In those early, experimental days of 1940 and 1941, very little equipment was carried by the paratroopers while jumping; some method, therefore, had to be found for delivering their weapons and ammunition.  The C.L.E.’s Development Unit conducted numerous experiments with air-dropped kit bags and weapon valises, large reinforced canvas bags, and wicker panniers.

Some early British Airborne equipment was based on German items; this was true for the helmet and the first “step-in” parachutist’s smock or “jumping jacket”.  Additionally, the German Airborne used bomb-shaped supply containers which were air-dropped via parachute; the C.L.E. determined to develop a similar “bombcell container” for British use.

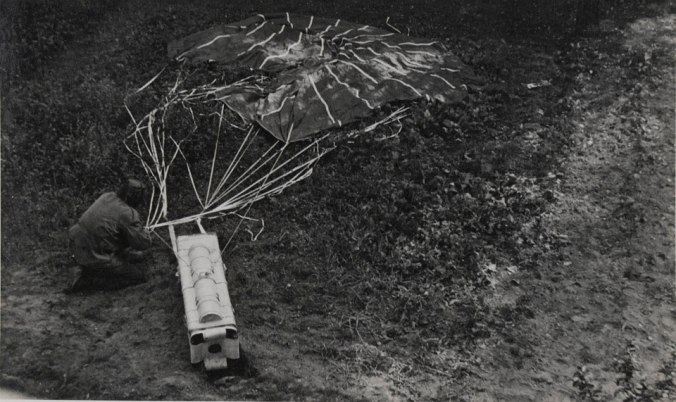
The result was the C.L.E. Container Mark I, which was a hinged tube long enough to hold rifles and light machine guns; it was made from plywood with a metal framework.  One end had a fitting for a parachute, and the other end had a “percussion head” or “crash dome” attached.  The percussion head was a primitive shock absorber; it was designed to collapse upon impact, thereby reducing the amount of force imparted on the container’s contents.  The percussion head was detachable and easily replaced, so that the rest of the container could be reused.  A battery-powered beacon could be attached to the container to make it easier to find in the dark.  By early 1943, the Mark I was joined by the Mark I.T., which was similar in size and appearance, but made entirely of sheet metal.  There was also the Mark III, which had the same diameter, but was eight inches shorter.  Additionally, the Type E and Type F Containers were adopted; these were rectangular in shape, and designed specifically for radio equipment.

Attach CLE Apr 44

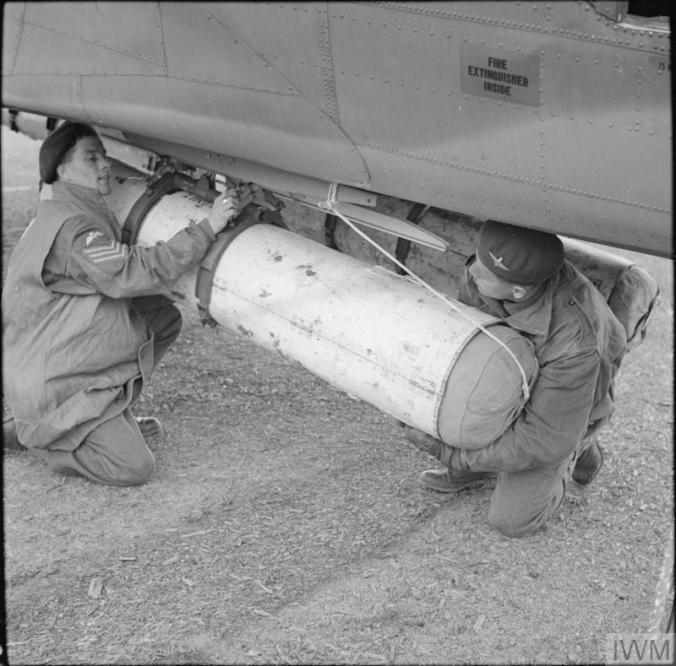
In April 1944, the 1st and 6th Airborne Divisions took part in a large-scale exercise in preparation for the invasion of occupied Europe.  In this photograph, two paratroopers attach a C.L.E. container to the hardpoint of a Douglas Dakota.  Note that the static line has already been attached, and the cradle is being fitted to the hardpoint.  This appears to be a Mark I container.  Photo from the Imperial War Museum (H 37727).

The containers could be attached to hardpoints on the exterior of an airplane’s fuselage; each hardpoint had a mechanical release operated by the pilot.  The Type E and F containers had attachment points built into the lid, but the cylindrical containers had to be fitted with a cradle which was then attached to the hardpoint.  Additionally, the cylindrical containers could be carried and dropped from the bomb rack of a standard bomber, which had the advantage that no additional training or aircraft modifications were required.  Typically, the containers were fitted with static line parachutes, although some applications required a drogue parachute to deploy the main canopy.

In February 1942, the C.L.E.’s Development Unit was renamed the Airborne Forces Experimental Establishment.  Later that year, the R.A.F. first started using the Douglas Dakota (the Lend-Lease version of the American C-47); it was the best cargo and transport aircraft of the war.  For dropping paratroopers, the Dakota was modified by adding seats and a static line, and the soldiers jumped from a side door, which was considered by the troops to be vastly superior to dropping through the hole of a converted bomber.  These aircraft were further modified by adding six hardpoints under the fuselage for carrying containers.

As time went on, methods were developed so that paratroopers were able to drop with their weapons and other equipment, reducing their dependency on the supply containers during the initial drop.  However, the Airborne Forces grew from small raiding forces to full divisions intended to take and hold vital objectives until relieved by ground forces; aerial resupply became essential for providing ammunition, rations, medical supplies, and all the other items necessary to fight and survive on the battlefield.  Aerial resupply was also used extensively in the Far East, where heavily-laden trucks found it difficult to navigate the poor roads and dense jungles found in Burma.

The containers continued to be used after World War II, although they were re-named; the initials “C.L.E.” were retained, but the name “Container, Central Landing Establishment” was replaced with “Container, Light Equipment”.  They were last used operationally in 1956, when 3rd Battalion, the Parachute Regiment, dropped into Egypt during the Suez Crisis.  The Mark I and Type E containers were considered obsolete by 1960, but the other containers were still used for training purposes at least through the 1960’s.

C.L.E. Containers:  Variants and Details

The C.L.E. Mark I Container was made from a metal framework faced with plywood; it was constructed as two halves that were then hinged together to form a cylinder.  It was closed with two external latches.  The Mark I was 6 feet 2 ½ inches in length, with a diameter of 1 foot 2 inches; it weighed 103 ½ pounds empty, with a maximum loaded weight of 350 pounds.

The C.L.E. Mark I.T. Container was the same length as the Mark I (6 feet 2 ½ inches).  However, it was made entirely of metal, and took the form of a flat-bottomed cylinder.  It was somewhat heavier at 135 pounds, but had the same maximum loaded weight of 350 pounds.  Like the Mark I, it closed with two external latches.  After World War II, the Mark I.T. was referenced as the Mk. 1 (T).

Mark I T Apr 44

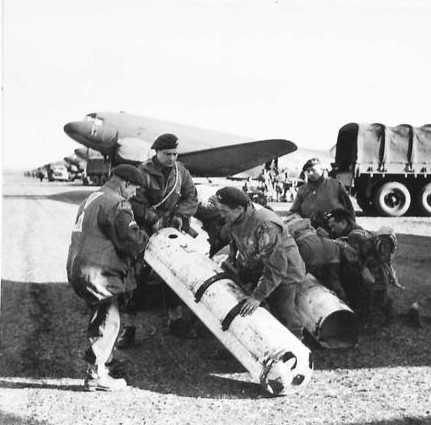
April 1944; another photograph from the same exercise as above.  Soldiers maneuver C.L.E. containers from trucks to the waiting aircraft.  The shape indicates these containers are Mark I.T. variants.  Photo from the IWM (H 37700).

The C.L.E. Mark III Container was shorter than the Mark I at 5 feet 6 ½ inches.  It was completely cylindrical, with a diameter of 1 foot 2 inches.  The Mark III was made of either all-metal or metal-framed plywood construction.  The Mark III weighed 113 ½ pounds empty; the original maximum loaded weight was 350 pounds, but after extensive use the maximum weight was revised to 400 pounds.  Unlike the earlier containers, the Mark III had an internal locking mechanism; a rectangular cutout at the parachute end gave access to the locking handle.  By 1943, the Mark III was intended to replace the earlier containers, unless a specific load required the greater length.  Post-war manuals reference the Mark III as the Mk. 3.

The Type E Container was rectangular in shape with a hinged lid, and was designed specifically for dropping the Number 18 wireless/telegraphy set.  While the 1943 manual does not list the size of the Type E, it does give the weight as 89 pounds empty, or 190 pounds when loaded with the No. 18 W/T set; the 1960 manual does not reference the Type E.

Types E & F from Manual

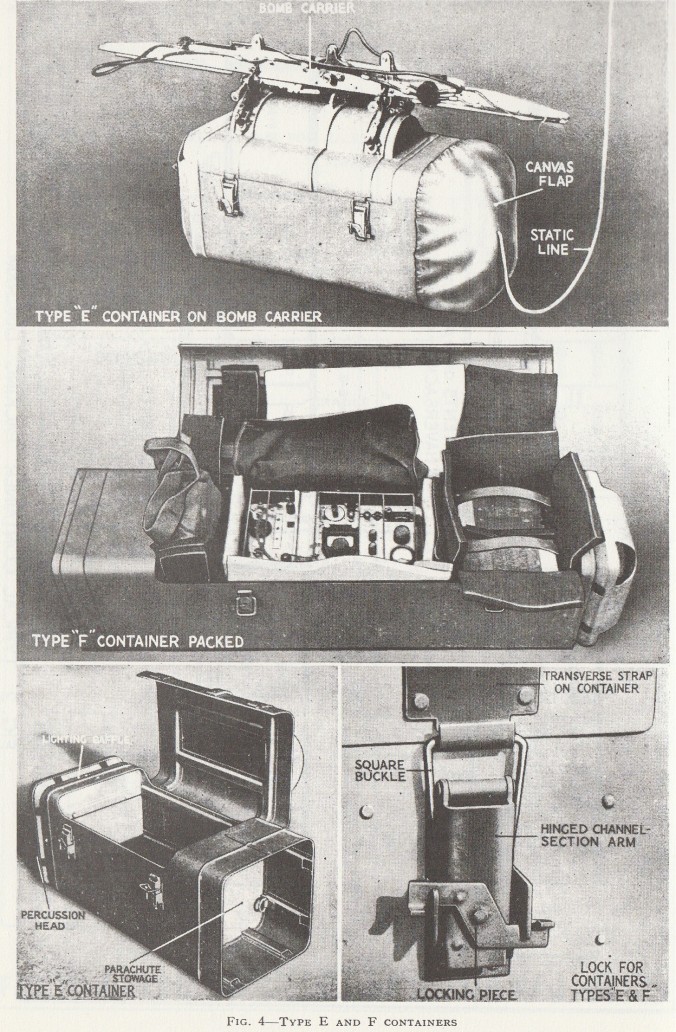
Type E and Type F containers; illustration from Air Publication 2453, Volume I, Section 2, January 1943.

The Type F Container was also rectangular, but longer than the Type E; it was 5 feet 8 ½ inches long, and 1 foot 2 inches tall by 1 foot 2 inches wide.  The Type F could carry several different wireless/telegraphy sets, specifically the No. 11, 19, 21 or 22 sets.  The container weighed 92 pounds empty; the loaded weight varied depending on the type of W/T set carried, but the maximum weight was 340 pounds.

Regardless of type, the training manuals stated that three or four men were needed to handle a loaded container*.

Other Methods

Another item developed for dropping supplies was the wicker pannier, which was essentially a very large wicker basket.  There were two halves, the top being slightly larger than the bottom so it could fit over it.  The two halves were not attached; there were no latches or hinges.  Instead, the two halves were lashed together with webbing straps.  This gave the advantage that the size of the load did not have to be precise; the pannier could be expanded as needed.  The top half had four rope handles at the corners.  The wicker pannier had a maximum loaded weight of 500 pounds, greater than any of the “bombcell” containers.

Typically, two panniers were bundled together; this was referred to as the “daisy chain” method, and naturally allowed for the panniers to be dispatched in half the time.  One pannier was stacked on top of the other, and they were attached with lightweight ties.  Each pannier had its own parachute, but with different lengths of static line; this would cause them to open at different times, breaking the ties and separating the two panniers.

Panniers1 from Manual

Wicker panniers loaded in a Douglas Dakota; they are stacked and ready for a “daisy chain” drop.  Illustration from Air Publication 2453, Volume I, Section 5, Chapter 2, January 1943.

A variant of the Dakota was designed specifically for dropping pannier loads; a series of rollers was added to the floor to make it easier to move the panniers to the door for the drop.  With a pair of panniers having a combined weight of up to 1000 pounds, the rollers were necessary for the “daisy chain” method.  It was this type of aircraft which was piloted by Flt. Lt. David Lord, V.C., when he was shot down over Arnhem.

Some supplies were bundled together and fitted to a cargo parachute without the use of a container; this method became increasingly common as the war progressed.

The Drop

When first adopted, the C.L.E. containers were dropped in the middle of the “stick” of paratroopers to make it easier for the soldiers to find their weapons and equipment.  As time went on, there was less reliance on the containers for the initial drop, and the containers could be dropped before, after, or even simultaneously with the paratroopers.  A delayed-opening device was developed for the cargo parachute which made it safer to drop the containers alongside the paratroopers.

Mark III Op Varsity

Operation Varsity, the crossing of the Rhine, March 1945.  The container in the foreground is a Mark III; the rectangular opening for the latching mechanism’s operating handle can be clearly seen.  Photo from the Imperial War Museum (BU 2531).

Most resupply drops were made from about 600 feet, regardless of type of aircraft or containers used.  However, for some operations, a fast-moving fighter-bomber could carry three or four bombcell containers and get through heavy anti-aircraft fire more easily than a large bomber or cargo plane; this method was primarily used for high-priority supplies or for clandestine operations, such as dropping supplies to the various Resistance organizations.

The standard cargo parachute had a 28-foot canopy, although smaller parachutes of 18 feet and 24 feet were also made.  The cargo parachutes were made in a variety of colors so that supply drops could be color-coded.  Different types of supplies, such as rations, ammunition, and medical equipment, could be designated by the color of parachute; another method would be to color-code the supplies intended for different units.  There was not a set system, and the color-coding was varied for each operation.

Type F Arnhem Nat Army Msm

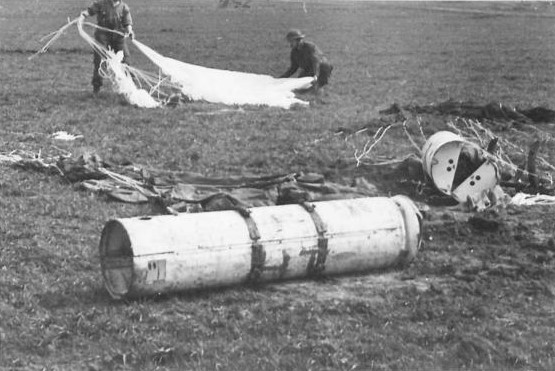
Operation Market Garden, September 1944.  A Type F container is recovered.  Photo from the National Army Museum.

While the R.A.F. naturally provided the aircraft and pilots, loading and dispatching the containers was the responsibility of the Royal Army Service Corps.  While the bombcell containers were deployed mechanically by the pilot or his designee, the wicker panniers required specially-trained Air Dispatchers to fly in the cargo hold and maneuver the panniers to the door.  Other R.A.S.C. troops were assigned to the Airborne Divisions who were responsible for gathering the supplies from the drop zones and distributing them to the rest of the Division.

Reenacting Tips

Original C.L.E. containers are highly prized on the collector’s market.  I have personally only seen originals in museums, and have never seen one in the United States.

My reenacting unit is very privileged to own a reproduction of the C.L.E. Mark III Container.  Several years ago, a member of the unit sent me an interesting proposal:  he was a professional machinist, and wanted to build a reproduction container.  He offered to make the reproduction at no charge for his labor, but requested that the unit pay for materials.  However, he had only seen photographs and asked if I had access to any schematics.  As unit leader, I quickly approved his proposal.  I had recently acquired a copy of the 1960-dated Military Parachutists Manual.  Even though published well after World War II, the manual included a chapter on resupply containers, including the Mark I.T., Mark III, and Type F.  The chapter contained line drawings, measurements, and weight tables; I scanned the entire chapter and sent it to my friend.

Mark III from 1960 Manual

The Mark III (or Mk. 3) container as illustrated in the Military Parachutists Manual (Air Publication 4215 / War Office 9514), January 1960.

The result was a reproduction of the Mark III Container.  Due to the limitations of the sheet metal available, the reproduction is slightly shorter than the original, and significantly lighter in weight.  However, I am responsible to single-handedly store and transport it, so I am very grateful it is not the full weight.  The crash dome is made from fiberglass and is somewhat fragile; however, the internal locking mechanism functions like the original.  I am very pleased with the finished product, and it has been a tremendous asset for our living history events.  We primarily use the reproduction container for public displays, particularly at air shows.  We have also used it at tactical reenactments, including events based on the Oosterbeek perimeter during Operation Market Garden.

Repro Container 2

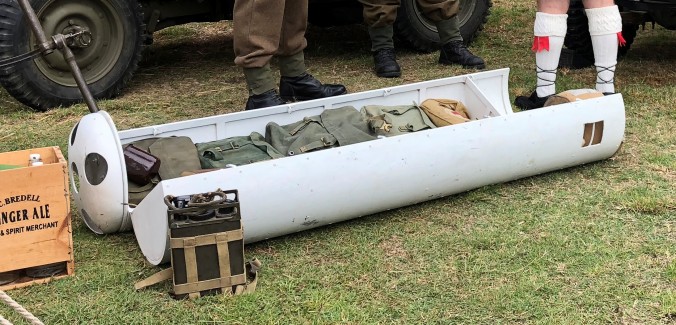
Reproduction C.L.E. Container Mark III at a public display.  Author’s photograph.

*My favorite film is A Bridge Too Far; however, while the scene where the young soldier carries a loaded container over his shoulder is very dramatic, it is also highly unrealistic.

Sources

By Air to Battle:  The Official Account of the British First and Sixth Airborne Divisions
His Majesty’s Stationary Office, 1945

Military Parachutists Manual
Air Publication 4215, War Office Code 9514
Section 6, Chapter 3:  “Supplies Dropping Containers”
January 1960

Bouchery, Jean, and Charbonnier, Phillipe
D-Day Paratroopers:  The British, The Canadians, The French
Histoire & Collections, 2004

Gregory, Barry
British Airborne Troops
MacDonald & Jane’s, 1974

Tanner, John, General Editor
RAF Airborne Forces Manual:  The Official Air Publications for RAF Paratroop Aircraft and Gliders, 1942-1946
RAF Museum Series, Volume 8
Arms and Armour Press, 1979
[Includes Reprints of Air Publications 2453 (January 1943) and 2453A (July 1945)]

The website of the Airborne Assault Museum
www.paradata.org.uk

“By Order of an Officer”: The Emergency Ration Tin

History

One of the items most commonly issued to British troops in the Second World War was the emergency ration.  This was a small tin containing a dense, high-calorie slab of chocolate, which was only to be consumed as a last resort when no other food source was available.

EmergencyRationSealedIWM

World War II emergency ration tin from the collection of the Imperial War Museum (EPH 4502).  Note the golden color from the waterproofing lacquer.  Unlike most surviving tins, this one still retains the clasped sealing band.

The emergency ration was described in a 1942 training pamphlet.

Operational Feeding:  The Use of Field Rations (1942)

B.  TYPES OF RATION

    1. The emergency ration is for men temporarily out of reach of any other source of food. In order to save weight it is made as small and light as possible. Its purpose is only to ward off hunger and exhaustion for a period of about 24 hours.  It does not purport to be a complete day’s food.  It weighs ½ pound.

C.  DESCRIPTION OF THE RATIONS

    1. Emergency Ration.  This consists of a small tin box about the size of a 2-oz. tobacco tin, and contains a solid mixture of a chocolate type of food, concentrated to give the maximum amount of food value for weight carried.  It is intended only to be used in EMERGENCY when all other sources of supply fail.  It is issued on the scale of ONE to every officer and man and MUST NOT BE EATEN EXCEPT ON THE ORDERS OF AN OFFICER.  It can be either chewed in small pieces or ground up and mixed with hot water to make a sustaining drink.

The lid of the tin was embossed with instructions, including a warning that the ration was only to be consumed on the orders of an officer.  The tin was made as weatherproof as possible; the exterior was treated with a waterproofing lacquer which gave it a golden color.  The lid’s raised edge contained a rubber gasket to prevent moisture getting inside the tin; a clasped metal band then sealed the tin shut.

Tins Repro & Orig

Two original emergency ration tins (below) with a reproduction from What Price Glory (above).  The lower right tin still has its waterproofing lacquer.  Author’s collection.

There was a pervasive belief amongst the soldiers, continued on by militaria collectors, that the emergency ration chocolate contained Benzedrine, an early form of amphetamine.  The lid’s embossed warning certainly seemed to give weight to the theory, however recent historians believe there was never any truth to the rumor.  The chocolate was probably enriched with vitamins and may have contained caffeine.  However, to my knowledge at least, the exact contents have not been determined, although there must be a wartime record of the ingredients in an archive somewhere waiting to be discovered.  Regardless, the intent of the emergency ration was to provide as many calories as possible in a small, weather-resistant and easy-to-carry package.  Like modern chocolate bars, it was pre-segmented; that is, there were grooves molded into the slab to make it easier to break into smaller pieces.

Once the contents were consumed, soldiers often kept the tin as a convenient way to carry tobacco or other small items; for example, the Imperial War Museum’s collection includes an emergency ration tin that still contained a packet of Japanese cigarettes when the Museum acquired it.  This is the likely reason why many of the tins have survived, and are now a popular collector’s item.  Not surprisingly, tins still containing the actual ration chocolate are very rare, and therefore highly prized.  Many surviving tins have also lost their gold-colored waterproofing lacquer.

Lid

Underside of the lid from an original tin.  Note that the red rubber weatherproofing gasket has partially survived.  Author’s collection.

Reenacting Tips

The emergency ration was typically issued to all troops at the beginning of an operation.  It is therefore an item that should be carried by any reenactor who wants to get the details correct.  While one can still find originals, they can be somewhat expensive; fortunately, reproductions are readily available.  I do not typically like to either endorse or criticize specific products or vendors on this website; however, I am going to make an exception in this case.  The emergency ration tin available from What Price Glory is an outstanding product; I have two originals, and the reproduction compares very favorably.  It is also quite inexpensive, so there really is no reason for reenactors not to have one.  The reproduction tin comes empty, ready to be filled with whatever one wishes to put inside.

At most living history events, I use my emergency ration tin as a miniature first aid and survival kit, containing bandages, allergy and pain medicines, a small compass, and folding scissors.  I normally also keep a few boiled sweets or cough drops inside.

If one wishes to use the emergency ration tin for its original purpose, a number of options are available.  I have an online friend in the UK who makes chocolate slabs specifically designed to fit the emergency ration tin and replicate the appearance of the original item; he sells them on eBay and Etsy (search for “Pegasus WW2 Displays”).  Other options, less authentic but perhaps more practical, would be to repackage a normal chocolate bar or energy bar; some trimming and reconfiguring is typically required.  The original ration chocolate was wrapped in waxed or greaseproof paper, although some may have used cellophane.  To repackage a normal energy or chocolate bar, use clear cling wrap or waxed paper.  I like to use unbleached waxed paper, which has a more vintage look than normal waxed paper; I purchased mine at a health food specialty store.

For the following photos, I used two different products, a Promax Chocolate Peanut Crunch protein bar and a Cadbury Fruit and Nut chocolate bar.

Fillings

The Promax bar was long and narrow; however, the thickness was just right for the tin.  I cut the bar in half and then cut a groove in the top of each half to try to replicate the appearance of the original ration (admittedly, the grooves did not really add anything).  I then placed one half next to the other and wrapped them in a small piece of unbleached waxed paper.

Protein Bar

For the chocolate, my plan was to carefully cut the bar in half, but it came out of the wrapper already broken in two.  I then stacked one half on top of the other and wrapped in more waxed paper.  Note that the Cadbury chocolates sold in the US are actually made domestically by Hershey’s under a licensing arrangement; they are not the same size as the British-made products.

Choco Prep

The original emergency ration was a very dense slab of chocolate.  However, I chose a Cadbury Fruit & Nut to put in my reproduction tin because I wanted the extra protein from the almonds.

I found it easier to wrap the Cadbury bar than the Promax bar, which resulted in a more satisfactory appearance.

Wrapped Choco

The completed process:  two stacked halves of a Cadbury chocolate bar wrapped in unbleached waxed paper.  It is not completely accurate, but reasonably close.

Update

I recently purchased another reproduction tin from What Price Glory and gave it a light coat of gold spray paint to replicate the appearance of the waterproofing lacquer.  The color is not exactly right, but I am pleased with the result; a bit of wear from field use will only improve the appearance.  I also bought some baking chocolate and a mold, but unfortunately, that experiment was not very successful.  I will stick with the protein bars and Cadbury chocolates for now.

IMG_3413

Links

What Price Glory reproduction emergency ration tin:

http://onlinemilitaria.net/products/977-UK-Emergency-Ration-Tin/?bc=no

Pegasus WW2 Displays on Etsy:

https://www.etsy.com/shop/PegasusWW2Displays?ref=l2-shopheader-name

Sources

Operational Feeding:  The Use of Field Rations (1942)
His Majesty’s Stationary Office

Bouchery, Jean
The British Soldier: From D-Day to V-E Day
Volume 1:  Uniforms, Insignia, Equipment
Histoire & Collections

Forty, George
British Army Handbook, 1939 – 1945
Sutton Publishing, 1998

Blanco: 20th Century Pipeclay

In a recent article, I wrote about the development of the 1937 Pattern Web Equipment.  No article on the subject would have been complete without at least a reference to Blanco.  Since then, I have decided to explore the subject further.  The website Blanco and Bull has the most complete description and history of the product itself that I have seen.  This article, then, is intended as a social history of the use of Blanco by the common soldier.

Background

During the 18th and 19th Centuries, the qualities that were considered most essential in a British soldier were a well-turned out appearance, and the ability to perform drill.  Buttons and boots had to be immaculately polished.  Leather equipment was typically issued in a light buff color, but had to be whitened by careful application of pipeclay; this chalky powder was mixed with water to make a paste.

Forcing soldiers to maintain a smart appearance was far more than just regimental vanity; it helped instill both pride and discipline.  This discipline was vital for the tactics of the time; smoothbore muskets were most effective when fired in large volleys, and it took an iron will to withstand an enemy’s fire while maneuvering into position.  More than anything else, it was this discipline that set the British soldier apart from his enemies.

While weapons and uniforms underwent significant transformation during the Victorian era, the attitudes of officers and NCO’s remained consistent.  Rifles replaced muskets, yet “spit and polish” was still considered more important than marksmanship.

Around 1880, the Joseph Pickering & Sons company developed a replacement for pipeclay; this was Blanco, promoted as a cleaner that could “remove stains and discolorations” from leather shoes, equipment, and sporting goods.  Blanco was produced as a cake of compressed white powder; like the pipeclay it replaced, it formed a paste when water was added.  It was promoted to both soldiers and civilians; however, the advertisements were somewhat misleading, as Blanco covered over discolorations rather than removing them.  Regardless, Blanco was found superior than pipeclay, and was officially adopted by the Army.

Blanco4

Blanco:  1950’s production Khaki Green No. 3 made by Joseph Pickering & Sons, Ltd. along with an Indian-made copy of the original white Blanco.  While the Indian version is noticeably smaller, the deep well is based on Pickering’s earliest products.  All photographs in this article are by the author.

While the soldier on home service or garrison duty was expected to have an immaculate appearance, standards were more relaxed on active service.  By the close of the 19th Century, British soldiers increasingly found themselves fighting enemies armed with rifles rather than swords and spears; soldiers on campaign were allowed to stain their leather equipment with tea to make it less visible.  The Army even adopted khaki uniforms for use overseas, although troops on home service still wore scarlet.  In response, Pickering’s developed Khaki Blanco, essentially the same product but with a coloring agent.

In the early 20th Century, cotton web equipment replaced leather.  Blanco was found to be even more effective on the new webbing; when applied with a stiff-bristled brush, one could get it into the weave of the material.  Khaki Blanco was already similar in color to the base webbing, but Pickering’s created new colors, including Web Blanco, which was a light pea-green.

After the Great War, Pickering’s adopted a numbering system for their products.  Khaki Blanco and Web Blanco were replaced by No. 61 Buff, No. 103 Khaki Green (Light), No. 97 Khaki Green (Medium), and others.  No. 97 was the color used by most units at the outbreak of World War II.  By D-Day, most units had adopted Khaki Green No. 3, or simply KG3.  While KG3 became the most common color, there were some units that retained other shades for the sake of their own traditions.

Impact on Soldiers

What was intended as a simple item to help give the soldier a smart appearance took on a life of its own.  Like its forebear, Blanco was one of the dreaded tools imposed on new recruits, who spent hours slaving over their webbing, polishing the brass and applying just the right thickness of Blanco.  This mindless and repetitive task was part of the Army’s procedure for turning individuals into well-disciplined soldiers.

To add insult to injury, Blanco was not typically an issued item; soldiers had to purchase their own from the NAAFI*.  Fortunately, NAAFI was a non-profit organization dedicated to improving the lives of British servicemembers; they contracted with Pickering’s to make bulk purchases of Blanco to sell at the lowest price possible.

When first purchasing Blanco, the soldier would get it in a round box made of zinc, which would not rust when wet.  Refills were simply wrapped in paper.  Each cake was made as a flat-bottomed disc; the top was dished for holding a small amount of water to get mixed with the product.

Blanco1

Post-WWII cake of K.G.3 in the zinc box designed to hold Blanco.  Zinc was chosen because it does not rust when wet.

Like many items in the British Army, the word Blanco was originally a noun but frequently used as a verb; a soldier Blancoed (or blanco’d) his webbing.  In this usage, capitalization and spelling lost any consistency.  Additionally, the Mills Equipment Company, the primary contractor for webbing equipment, created their own “web cleaner”; this was a loose colored powder sold in a shaker tube, but was still called Blanco by the soldiers.

Stanley Swift enlisted in the Royal Artillery in 1940 and wrote of his experiences.

“We were given blanco, a greenish type of chalk which when dipped in water became a liquid mass.  We had to blanco our equipment and polish our brass, which was a gorgeous shade of green when we received it, and clean and spit and polish some more.  It was punishment of the first order.  And it was evil the way we were expected to do everything in ten minutes and turn out on parade.”

After his initial training, Swift was transferred to the 5th Royal Horse Artillery.

“We arrived about 3:00 a.m. at Coggeshall, somewhere in the middle of nowhere in the south of England, and we were immediately told to blanco our webbing as it was the wrong color for the regiment.  At 3:00 a.m.!”

After further training, Swift was sent to Egypt to join 8th Army.  The Allies had not yet taken control of the Mediterranean, so the convoy of troopships and escorts sailed all the way around Africa to the Suez Canal; the journey took several weeks.

“Such a great number of troops on board ship must be kept occupied, so each man was given a great lump of blanco.  This we were told to daub on our webbing equipment.  We didn’t take very kindly to this enforced activity, so everybody as one man threw his blanco into the ocean.  This time we must have dyed the sea green.  Nothing was ever said.  Our restlessness in being locked in a ship for a full month, crammed like sardines, was no joke, so it was well-meant to try to keep us occupied but not very successful.”

Oh, What a Lovely War!  A Soldier’s Memoir
Stanley Swift

Blanco2

Underside of the zinc box.  While zinc does not rust, it does slowly oxidize, and this tin developed a hole through the Pickering’s trademark.

James Sims had a similar experience when he joined the Royal Artillery in 1943.

“I completed almost a year at Larkhill on Salisbury Plain with the 4th Field Training Regiment, Royal Artillery, and didn’t much care for it.

If you had any spirit at all the RA seemed determined to break it.  Their attitude has been summed up as follows:

If it moves – salute it!
If it stands still – blanco it!
If it’s too heavy to lift – paint it!”

After meeting a recruiting sergeant from the Parachute Regiment, he volunteered for the Airborne Forces.

“…We had to report to Clay Cross, the Airborne Forces Depot near Chesterfield.  Here we were taught battle drill.  We were also given special lectures and shown training films.  There was some bull but it was nothing like as bad as in the RA.  We did, however, have to blanco our equipment for guards, even our para steel helmets.”

Arnhem Spearhead
James Sims

“Bull” was originally a term for polishing boots, but became soldier’s slang for any mindless, repetitive task.  Based on the statement about the helmet, it seems likely Sims was issued a jump helmet with a webbing chinstrap, which was typically Blancoed, as opposed to the earlier leather chinstraps.

After World War II, conscription continued through the 1950’s, and was known as National Service.  Even though the world had changed by this point, the British Army’s attitudes and methods had not.  Tony Thorne wrote of his experience of National Service.

“We were issued khaki belts and gaiters.  These have to be Blanco’d.  Blanco is not white as the name might imply, but khaki.  It is like a slab of chalk, which must be dissolved with water to exactly the right consistency, so that it can be painted on to the webbing smoothly.  In fact it produces tiny lumps like mother’s gravy, which then increase in size when they dry on the webbing.  The belt has little brass clips and the gaiters have little brass buckles at the opposite end to the black leather straps.  The brasses must be shone with Brasso and the leather straps must be polished with boot polish.  One of the miracles of military design is that all these cleaning materials are chemically allergic to one another.  If the tiniest spot of Brasso makes any form of contact with the Blanco on the webbing, a small white ring appears which remorselessly spreads outwards in ever-increasing circles until it forms a huge unsightly stain.  No man has ever discovered any method of removing this stain other than re-painting the dreaded Blanco about two hundred times.  Even then, one can collapse exhausted into the pit thinking that the damned spot is out, only to be greeted by it poking its head out anew at 5.30 am just half an hour before the morning inspection.”

Brasso, Blanco & Bull
Tony Thorne

While Blanco was consistently used in Britain and the European Theater, it was not suitable to all conditions.  Troops in the Far East learned that Blanco quickly washed off their webbing in the Monsoon rains; webbing had to be vat-dyed a jungle green color.  Troops sent to North Africa typically arrived with green-Blancoed webbing unsuited for the desert.  While some units used khaki Blanco, most troops used salt water and a stiff brush to scrub the green Blanco out of their equipment and allowed the webbing to get sun-bleached to a nearly-white color.

In the 1950’s, Pickering’s created a new webbing renovator, which was sold as a tin of colored paste.  The colors were based on Blanco, but the product was easier to apply.  The Army then adopted 1958 Pattern webbing equipment, which was manufactured in dark green.  While cadets and reservists continued using 1937 Pattern equipment through the 1980’s, Blanco finally became obsolete, and Joseph Pickering & Sons, Ltd., went out of business.

Reenacting Tips

Many years ago, my friend and I attended a public event; we wore our best battledress, and we had given our boots and cap badges a good polish.  We were approached by a pair of gentlemen who had served in the British Army and fought in Burma.  Living in the United States, meeting British veterans is a rare treat.  One of the pair had been a Regimental Sergeant Major; the other joked that the RSM had spent so much time up a tree in the jungle that he had grown a tail.

The former RSM said he had seen many reenactors over the years, but had never been impressed with them.  But he paid us a tremendous compliment by saying that we were by far the best he had seen, because we held ourselves with the correct military bearing, and we had taken the time to polish our boots and badges.  However, he then asked why my webbing belt was not Blancoed.

I was hugely embarrassed.  I tried to explain that Blanco had become extremely rare; at that point, I had only ever seen Blanco cakes on display at military museums.  He was astonished that something that had once been completely ubiquitous had become a collector’s item.

Millions of cakes of Blanco were produced over the decades, but most were used for their intended purpose.  Real Blanco was discontinued in the 1950’s; a post-war cake can occasionally be found by diligently searching internet auction sites, but it is rare, and it is not cheap.

Fortunately, a number of Blanco reproductions and substitutes have become available.  Two of the largest UK-based reenactment suppliers carry products they describe as “liquid Blanco”; these are essentially custom-colored paint.  I have not used these personally, but several friends have been pleased with these products.

Another vendor in the UK has managed to develop a true reproduction Blanco, that is, a cake of compressed powder.  The reproduction cake is somewhat smaller than the original, and the well is very shallow.  However, it is the closest item I have found to the original; it looks, feels, and even smells like original Blanco.  It even comes packaged in a reprint of Pickering’s paper wrapper, which is a nice touch.

A company in India produced its own version of Blanco for the Indian Army, and it is currently available through a US-based reenacting vendor.  Unfortunately, it is only available in white and khaki.  The Indian cake is smaller than the original, but it has a deep well on top like the early versions of Pickering’s.

Blanco6

The zinc box only needed to be purchased once.  Refills came in a simple paper wrapper.  After World War II, the traditional printing was eliminated.

Some reenacting genius discovered a shoe cream that is a similar color to KG3 and applies easily to webbing.  A small amount of model paint can be mixed with the shoe cream to get even closer to the right color.  This shoe cream seems to be fairly similar in consistency to the post-war Pickering’s web-cleaning paste.  I have had very good results with the shoe cream mixture; it is easy to apply and is overall less messy than the liquids and compressed powders.  My only complaint is that it is not very durable and needs frequent touching-up.

Blanco5

1937 Pattern belt and braces drying after having been treated with a mixture of shoe cream and model paint.  The original Blanco was used to ensure correct color matching.

The Blanco and Bull website is an excellent resource; not only does it have more detail on the history of Blanco, it also compares the different reproductions summarized above.

Whatever method is used, do it outside and put down newspaper or plastic sheeting.  Just staging the photographs for this article turned my fingertips green; the stuff gets everywhere.

*The Navy, Army and Air Force Institutes, or NAAFI, is the organization responsible for maintaining shops and canteens for British servicemen and women.

Sources

The Pattern 1937 Web Equipment (1939)
His Majesty’s Stationary Office

Barthorp, Michael
The British Army on Campaign, 1882 – 1902
Osprey Publishing, 1988

Brayley, Martin J.
British Web Equipment of the Two World Wars
Europa Militaria:  The Crowood Press Ltd., 2005

Chappell, Mike
British Infantry Equipments 1908 – 80
Osprey Publishing, 1980

Farwell, Byron
Mr. Kipling’s Army
W. W. Norton & Company, 1981

Holmes, Richard
Redcoat:  The British Soldier in the Age of Horse and Musket
W. W. Norton & Company, 2001

Sims, James
Arnhem Spearhead
First published by Imperial War Museum, 1978, Republished by Arrow Books, Ltd., 1989

Swift, Stanley, and Luscher, Evelyn A.
Oh, What a Lovely War! A Soldier’s Memoir
Hellgate Press, 1999

Thorne, Tony
Brasso, Blanco & Bull
Constable & Robinson, Ltd., 1998

Blanco and Bull:  The Webbing and Boot Cleaning Website
https://www.blancoandbull.com/

To Carry the Load: The 1937 Pattern Web Equipment

History and Development

Throughout history, armies have needed to provide their soldiers a set of equipment to carry ammunition, rations, and other necessities.  Historically, this equipment was made of leather, and typically consisted of various pouches suspended from belts and shoulder straps.  If well-cared for, the leather was strong and durable; but if not properly maintained, or subjected to severe weather, it was liable to dry out and crack.

In the late 19th Century, military equipment was revolutionized by an American Army officer, Captain Anson Mills.  He noted that ammunition tended to get stuck in the individual cartridge loops of the leather belts worn by his men; he therefore experimented with a cartridge belt made from cotton canvas.  Pleased with the results, Captain Mills joined forces with a weaver; together, they designed machinery and established a factory for making cartridge belts made from a tightly-woven cotton webbing.  These were in turn adopted by the U.S. Army and used successfully in the Spanish-American War of 1898.  Soon after, a limited number of webbing bandoliers were used by British troops in the Anglo-Boer War (1899 – 1902).

In addition to his American operation, Captain Mills established a second company in Great Britain:  The Mills Equipment Company, Ltd.  This company designed and produced the 1908 Pattern Web Equipment, the first complete set of non-leather infantry equipment adopted by the British Army.  During World War I, the 1908 webbing performed extremely well, and held up under the appalling conditions of trench warfare better than other armies’ leather equipment.

normandy webbing rsf

A section of 6th Battalion, Royal Scots Fusiliers, fighting in the Normandy hedgerows in June or July, 1944.  This is a good view of the 1937 Pattern web equipment:  the haversacks, entrenching tool carriers and waterbottle carriers are clearly seen.  The Bren gunner has covered his haversack with the camouflaged face veil.  Photo from the collection of the Imperial War Museum (B 5959).

With the massive conscription efforts of World War I, millions of sets of 1908 Pattern webbing were produced.  At wars’ end, the Army was drastically reduced in size, and returned to its primary function of garrisoning the British Empire.  There were enormous stocks of 1908 Pattern equipment in stores, and the British government was reluctant to invest in developing a replacement.

In the late 1920’s, it was recognized that the nature of warfare was changing; accordingly, the government authorized the Mills Equipment Company to experiment with designs for a possible new set of equipment.  The Army maintained official oversight and established a committee to provide input, but otherwise Mills was left largely to their own development.  The designers wanted the new equipment to be lighter in weight than the 1908 Pattern.  Additionally, the Army was becoming increasingly mechanized.  It was assumed that troops would be transported to the front lines rather than having to march; to better accommodate usage in vehicles, the designers wanted to avoid having any components of the equipment hang below the waistbelt.  It was also assumed that the heavier and bulkier items of uniform and gear would be transported by vehicle and not carried by the soldiers themselves.

By 1932, the Mills Equipment Set Number 3 underwent troop trials, and was then officially adopted in 1934.  However, this set was never produced or distributed in large numbers; the adoption of the Bren light machine gun, and the need to carry its magazines, required a significant re-design.

The result was adopted and designated as the 1937 Pattern Web Equipment; the official training manual was published in 1939.  According to the manual, the 1937 Pattern was a direct descendent of, and improvement upon, the 1908 Pattern; unfortunately, the troops who transitioned from one to the other did not see it as an improvement.  However, in one major respect, it was a departure from all earlier designs.  Historically, the different arms had their own specific equipment; that is, one set for the infantry, another for the cavalry, and often yet another for the artillery and engineers.  The 1937 Pattern was designed to be used by the entire British Army; component pieces intended for one branch could be interchanged for other components.  The equipment was based around a waistbelt and a pair of braces, or shoulder straps.  From there, different pouches and packs could be attached depending on the role of the individual soldier; there were also items designed specifically for officers.  For the purposes of this article, only the infantry equipment will be examined in detail.

Like the 1908 Pattern, the 1937 Pattern equipment was made from cotton webbing.  The cotton yarn was pre-shrunk and dyed a light khaki color before weaving; the weave design was extremely tight for both durability and water-resistance.  The various buckles, keepers and press-studs (snap closures) were made of brass.

webbing desert

The 1937 Pattern Web Equipment for infantry:  waistbelt, braces, basic pouches, bayonet frog, entrenching tool carrier, and water bottle carrier.  Troops in North Africa typically wore their webbing without Blanco.  All photographs in this article are by the author of items in his collection, unless otherwise stated.

The Mills Equipment Company was the primary contractor, but with the outbreak of World War II, dozens of other manufacturers throughout Britain and the Commonwealth also made webbing equipment; it was produced in Canada, Australia, India and South Africa.  Canadian webbing was of very high quality, and tended to have a yellow tinge to its khaki color.  Indian and South African webbing tended to be much poorer in quality; the webbing itself was often less-densely woven, while the brass keepers were somewhat thin and flimsy.

Brass was a vital war material, as it was needed for ammunition casings.  As World War II progressed, the various buckles and keepers were sometimes made from mild steel with an anti-rust treatment.  Much post-war equipment was made with mild steel hardware painted black.

After World War II, the 1937 Pattern equipment soldiered on in Korea and several colonial conflicts during the breakup of the British Empire.  It was finally replaced by the 1958 Pattern Web Equipment, but the 1937 Pattern was used by cadets and reservists nearly to the end of the 20th Century.

Components

The infantry components of the 1937 Pattern webbing were as follows:

  • Waistbelt
  • Braces
  • Basic pouches
  • Bayonet frog
  • Waterbottle carrier
  • Haversack
  • Pack
  • Shoulder straps
  • Supporting straps

Details of these items follow.

Waistbelt.  The waistbelt was originally made in two sizes, labeled as small and large.  In 1941, an extra large size was adopted; the small size was later renamed as normal.  The belt was adjustable by placing two pairs of hooks into a series of loops on the inside of the belt.  The buckle was a simple clasp that relied on the tension caused by a tight fit to keep it closed.  The back of the belt had a pair of buckles to which the braces attached.

Braces.  The braces were made in two sizes, normal and long.  The braces were significantly narrower than those of the 1908 Pattern, except at the shoulders where the braces widened to better distribute the weight of the equipment.  The left brace included a small loop through which the right brace was fed; this loop was often eliminated in later production versions.

Basic pouches.  Two large pouches, designated as basic pouches, were attached to the front of the belt via brass hooks which were inserted into the belt’s loops.  The pouches also had buckles at the top for attaching the braces.  The basic pouch was designed to hold two magazines for the Bren L.M.G.; alternatively, the pouch could hold grenades or projectiles for the 2-inch mortar.  Rifle ammunition was issued in a cloth bandolier which was worn over the shoulder to allow the basic pouches to carry ammunition for the support weapons.

After the Dunkirk evacuation, many soldiers complained that their basic pouches were too low and hit their thighs when getting into a crouching or kneeling position.  Accordingly, the Mark II pouch was introduced, with the brass hooks moved down one inch, causing the pouch to ride slightly higher on the belt.  Many of the original pouches were retrofitted to the Mk. II configuration.  After the adoption of the Sten machine carbine, the Mark III pouch was adopted, as the earlier pouches were too short to snap shut when filled with Sten magazines.  In 1944, a quick-release tongue-and-loop fastener was adopted to replace the snap fastener; very few pouches with this fastener were issued during the war.

burma 44

Troops from the Royal Welch Fusiliers on patrol in Burma, December 1944.  The basic pouches and position of the waistbelt are clearly seen here.  Photo from the Imperial War Museum (SE 2889).

Bayonet frog.  As originally issued, the only item suspended from the waistbelt was the bayonet frog.  The Rifle, No. 1 Mk. III, with its lengthy 1907 Pattern bayonet, was still in use when the webbing was adopted.  However, the No. 4 Rifle and its short spike bayonet were under development, reducing the designers’ concern over an item hanging below the belt.  The bayonet frog incorporated a number of loops, the largest of which simply slipped onto the belt, rather than using any hardware.  The bayonet scabbard was held by a twin pair of loops at the bottom of the frog; the scabbard stud protruded between the loops.  Yet another loop at the top of frog went over the bayonet hilt to reduce movement; this upper loop was often eliminated once the spike bayonet went into production.  Later frogs also had to be slightly modified to allow the spike bayonet’s scabbard to sit in the right position; this was often done by making a hole or split in the upper of the twin loops through which the scabbard stud was inserted.

bayonet frogs

Bayonet frogs.  Notice how the frog had to be modified for use with the Number 4 spike bayonet.  Typically, a hole was cut in the upper of the twin loops; in this instance, the loop has been split, then stitched around the scabbard stud.

Waterbottle carrier.  The original waterbottle carrier was described as a framework of webbing straps; collectors sometimes call it the “skeleton-type” carrier.  Later in the war, a simple webbing sleeve carrier was adopted.  Originally, the waterbottle was intended to be carried in the haversack, and the carrier only used under certain conditions, but in actual practice it was nearly always suspended from the brace ends.  For more information on the waterbottle and carrier, please my earlier article on field hydration.

Haversack.  The haversack was often called the “small pack”, both by the troops who used it and by modern collectors.  The haversack had internal dividers; the smaller pockets were for the water bottle and mess tins, while the larger section was for the wool jumper or cardigan.  The groundsheet was folded and carried under the flap of the haversack; although not described in the training manual, the anti-gas cape was frequently rolled and tied to the top.  Invariably, troops carried more equipment in the haversack than the designers intended; although not an official practice, the tea mug was often suspended from the haversack by running a strap through the mug’s handle.

small packs

A pair of haversacks, one filled and one empty.  The right-hand haversack is in nearly-new condition and shows the color of the webbing when issued.  The left-hand haversack has been treated with Blanco, most recently with a modern substitute.  The left-hand haversack is unusual in that the buckles are brass, but the strap-keepers are steel.

small pack interior

Interior of the haversack showing the internal dividers and some of the typical contents (waterbottle, mess tins, and holdall).

Pack.  The 1908 Pattern pack was re-adopted, unchanged, for use with the 1937 Pattern equipment.  If the pack was worn, the haversack was moved from the back to the left side.  The pack was intended to carry the greatcoat, cap comforter, holdall (toiletry roll), towel, and a spare pair of socks.  However, the socks and holdall were more commonly carried in the haversack.  The pack was uncomfortable when worn, but fortunately this was rarely done, as the pack was typically kept with unit transport.  The pack was often called the “large pack” to better differentiate it from the haversack or “small pack”.

Shoulder straps.  The shoulder straps could be used with either the pack or the haversack.  Each shoulder strap consisted of two lengths of webbing; the wide portion buckled to the top of the pack, and the narrow portion to the lower.  These component straps then joined at a brass hook for attaching to the basic pouch, intended to help distribute the weight.  Because of their shape, the shoulder straps are often referred to as “L-straps” by modern collectors.

Supporting straps.  The supporting straps connected to the shoulder straps and crossed over the pack; the name derives from the idea that they would help support the weight of the pack when worn.

Entrenching tool.  At first, the 1937 Pattern equipment did not include an entrenching tool.  In 1939, an entrenching tool with a fixed haft and square head was rushed into production; it was very similar in appearance to that used by the Germans.  Not many of these were issued, and those troops who did receive the item did not like it.  The 1908 Pattern entrenching tool was therefore re-adopted; this was a combination pick and shovel, with a removable handle or helve.  The Mark II helve, adopted in 1944, had lugs for attaching the Number 4 spike bayonet so the helve could be used as a mine-prodder; this version saw very limited use during the war.  The webbing carrier for the entrenching tool held the tool head inside a pocket, with the helve strapped to the outside; the carrier was suspended from the brace ends.  It was not uncommon for the helve to slip out of the carrier; an extra strap was added to the carrier in 1945, but few of this variant were issued before war’s end.

e-tool

The entrenching tool carrier; the tool’s head is enclosed in the webbing pocket while the helve is strapped to the outside.  Note that this is the Mark I helve; the Mark II had a bayonet lug for the spike bayonet.

How to Assemble

The following description is copied from the 1939 manual; however, the references to the manual’s photographs have been omitted.

  1. Fit the waistbelt comfortably tight by adjusting each end equally. Adjustment is made by withdrawing the double hooks (at the ends of the belt) from the loops woven inside and re-inserting them into loops a corresponding distance from each end.  Before re-inserting the hooks, the belt may be tried on, and adjusted as may be necessary.  Once the belt is fitted it need seldom be altered.  The hooks are inserted by pinching up the webbing… fasten the hook and loop buckle, by passing the hook part through the loop of the other part and not by catching the hook over the outer bar.
  2. Slip the bayonet frog over the left end of the belt and bring it to a position so that it will hang, when the belt is put on, upon the left hip.
  3. Attach the basic pouches on the outside of the belt by passing the double hooks over the upper and lower edges of the belt and inserting the hooks into the woven loops, so that they correspond each side, in a position to bring the buckles on top of the pouches in line with the centres of the shoulders.
  4. Pass one end of the right brace (without loop inside) through the loop inside the rear end of the left brace and attach the rear ends of each brace to the respective buckle on the back of the belt. Pass the front ends of the braces through the centre opening of the buckle on top of the basic pouches, taking care not to twist the braces in doing so.  Try the equipment on and make any necessary adjustment of the braces at all four points of attachment to ensure that they extend below the lower edge of the belt equally, thus ensuring that the wide portions of the braces lie evenly on the shoulders.  Finally, pass the free front ends of the braces down behind the pouches, between the back of the pouch and the web chape carrying the buckle, and pull down firmly.
assembly

This detail shows the method of assembly.  The backside of the belt has a series of loops for the hooks on the belt-ends as well as the hooks on the basic pouch.  The brace is buckled to the top of the pouch, and the waterbottle carrier buckles to the brace-end.

Orders of Wear

There were four designated Orders of Wear, as follows:

Marching Order:  waistbelt; bayonet frog; pouches; braces; pack with shoulder straps and supporting straps; haversack hung on left hip; waterbottle and carrier hung on right hip; entrenching tool carrier hung on rear.

Battle Order:  as Marching Order, but without pack; the haversack is worn on the back.  Officially, the waterbottle was to be carried inside the haversack in Battle Order, but this was rare in actual practice.

Musketry Order:  waistbelt; braces; pouches; bayonet frog.

Drill Order:  waistbelt and bayonet frog.

Differences from the Training Manual

The 1939 manual for the 1937 Pattern Web Equipment describes it as a development of the 1908 Pattern, but lighter in weight.  While it was lighter, it was not necessarily an improvement; the 1908 Pattern was well-balanced and comfortable, while it was difficult to adjust the 1937 Pattern to a comfortable fit.

The manual describes the haversack as being worn “rucksack-fashion”, and goes on to state that it was easy to remove and get to its contents (I laughed the first time I read that statement).  The haversack was best worn high on the back; if it hung low, it bounced during marching or running.  Unfortunately, tightening the shoulder straps to get the haversack to ride high made it much more difficult to take off.  Additionally, as noted above, far more items were carried in the haversack than originally intended; the increased weight and bulk also made it harder to get a comfortable fit.

The official manual also states, “When the equipment has once been properly fitted it will be kept assembled as far as possible.”  However, as noted above, Drill Order consisted of just the belt and bayonet frog.  Training sessions alternated between foot drill and fieldcraft, which meant frequent disassembly and reassembly of the equipment.  Further, many units ordered that the waistbelt was to be worn separately as a “walking out” item with best battledress.

The section of the manual on care and preservation states, “Should the equipment become in a dirty or greasy condition, it may be washed, using warm water, soap and a sponge.  Then rinse with clean water, and when thoroughly dry apply the cleaner in the manner laid down in the instructions accompanying it.  No cleaner may be applied to the equipment unless previously approved by the War Office… The metal work will not be polished, but allowed to get dull, so as to avoid catching the rays of the sun.”

pouches

A series of basic pouches.  The one farthest left is a Mark II pouch, without Blanco; the remainder are Mark III pouches.  The center pouch was treated with a dark shade of Blanco, but much has worn off; the pouch left of center was treated with a lighter shade, but is remarkable in how well-preserved the Blanco is.  The two pouches on the right were both made in 1944 and feature the quick-release fastener as opposed to the brass snap-closure.

There were two approved webbing cleaners, although the term “cleaner” is rather misleading.  By far the more common “cleaner” was Blanco, made by Joseph Pickering & Sons, Ltd.  This was a cake of densely-packed colored powder; a wet brush or sponge was used to build up a paste and apply it to the webbing.  The Mills Equipment Company made their own webbing cleaner, which was a colored powder sold in a shaker tube; the powder was sprinkled onto the webbing prior to adding water and brushing into the webbing.

For something that was supposed to sustain the soldier on the battlefield, the recruit’s first exposure to webbing equipment was the obsession of his superiors with a smart parade-ground appearance.  Soldiers, especially new recruits, spent countless hours polishing the brass hardware and applying just the right amount of Blanco to their equipment.  If applied too thinly so that any of the actual khaki web showed through the Blanco, the soldier was punished; yet, if it was applied too thickly, it would crack and flake off, with a similar result.  Fortunately, once on operations, a more practical approach typically prevailed.

Tips for Reenactors

When I first started collecting webbing equipment in the mid-1990’s, 1937 Pattern web equipment was cheap and plentiful; that is no longer the case.  Most components are still available, although significantly higher in price, and some items require diligent searching of the internet.

Reproductions of most items are now readily available.  It appears that all reproduction 1937 Pattern webbing is made in India; when first on the market, these reproductions were of poor quality.  Fortunately, in recent years, the webbing itself has improved, although the brass hardware still seems a bit flimsy.

People today are generally larger than seventy years ago; most reenactors would be well-advised to purchase long braces and large or extra large waistbelts.  To help ensure the correct fit, remember that the waistbelt should be worn just below the ribcage, regardless of the modern concept of the waistline; far too many reenactors wear their webbing with the belt too low.

As noted above, it was common to wear the waistbelt separately as a “walking-out” item with best battledress.  Reenactors will frequently purchase a separate belt for this purpose; this seems like a reasonable solution, but historically, soldiers had to break down their equipment to wear just the belt.

Many reenactors use the Mark II entrenching tool helve, as many of these were made post-war and are now more common than the Mark I.  However, very few Mk. II helves actually saw wartime service.

Blanco is an interesting subject, and deserves its own article.  Suffice it to say here that original Blanco has become quite scarce, but reproductions and substitutes are now available.

Sources

The Pattern 1937 Web Equipment (1939)
His Majesty’s Stationary Office

Brayley, Martin J.
British Web Equipment of the Two World Wars
Europa Militaria:  The Crowood Press Ltd., 2005

Chappell, Mike
British Infantry Equipments 1908 – 80
Osprey Publishing, 1980

Blanco and Bull:  The Webbing and Boot Cleaning Website
https://www.blancoandbull.com/

webbing eto

The 1937 Pattern equipment as it would have been worn in Northern Europe, but without the entrenching tool.  Original Blanco is rare; this set of equipment has been treated with a modern substitute to replicate how it would have appeared operationally.  The parade ground would have seen a much heavier application of Blanco.

“You Will Do Your Work on Water”: Hydration in the Field

You may talk o’ gin and beer
When you’re quartered safe out ‘ere,
An’ you’re sent to penny-fights an’ Aldershot it;
But when it comes to slaughter
You will do your work on water,
An’ you’ll lick the bloomin’ boots of ‘im that’s got it.

– Rudyard Kipling, Gunga Din

The human body needs to be kept hydrated; a person can function longer without food than without water.  Therefore, no military equipment would be complete without giving the soldier a method of carrying water.

The standard British water bottles used in both World Wars were very similar; the Mark VI version issued with the 1908 pattern webbing equipment was replaced by the Mark VII, issued with the 1937 pattern equipment.  Both were made of enameled steel with a wool cover, with a stopper made of cork which was attached to the bottle with a short length of cord.  Each version held two Imperial pints of water, or 40 ounces.

Webbing Detail

The British Mark VII water bottle in its webbing carrier, attached to the 1937 pattern equipment.  Photo by the author of items in his collection.

When the 1937 pattern equipment was adopted, the original intent was that the water bottle would be carried in the haversack, or “small pack” as it was commonly called.  However, a webbing carrier was also developed; it could attach to the ends of the braces and hang below the waistbelt.  Officially, use of the webbing carrier was not the preferred method.  In actual practice, however, more equipment was carried in the small pack than the designers had intended, and the troops were forced to use the carrier simply to make room.  Because of the inherent difficulties in resupplying Airborne troops, they sometimes carried two water bottles:  one suspended on the carrier and a second inside the small pack.

The original water bottle carrier was made of webbing straps.  A later version consisted of a webbing sleeve; while this version used more material, it was easier to manufacture and saved labor costs.  The earlier type was often called the “skeleton” carrier, and the later type the “envelope” carrier.  Some modern militaria vendors have tried to assert that the envelope version was only issued to Airborne troops, implying somehow that it was more rare or specialized, and therefore more desirable to collectors; that is completely untrue and easily disproven.

Three Carriers

Three water bottles with carriers.  The top right is the original version, sometimes called the “skeleton” carrier.  The other two are examples of the later “envelope” version.  Note the brass buckles for attaching to the brace-ends of the webbing equipment.

The envelope carrier has a web strap at the bottom to support the weight of the water bottle, but is open at the top.  The skeleton carrier has a retaining strap that is closed with a large snap or press-stud; some Indian-made versions closed with a buckle.  The intent was obviously that the water bottle would simply be lifted out, with the carrier remaining attached to the rest of the webbing.  However, I have found at living history events that this is easier said than done.  Over the years, I have used several different carriers, of both types, and all of them have been very tight.  Getting to the water bottle has often required significant effort, or assistance from a friend.  Between events, some of my friends have experimented with soaking the carrier in hot water and stretching; the most successful method involves placing wooden shims between the bottle and the wet carrier, then allowing it to dry.  I assumed that the carriers had all somehow shrunk while sitting in a warehouse for the last several decades; surely they could not have been so difficult to work with during wartime.

As I have mentioned in previous articles, one of my favorite authors is George MacDonald Fraser.  His book, Quartered Safe Out Here, is an extraordinary memoir of his service in Burma, fighting the Japanese as part of Slim’s 14th Army.  Fraser’s title was inspired by Kipling; I thought I would follow suit with this article.  There is a remarkable segment in Fraser’s book dealing with the water bottle and its carrier.  It is a somewhat lengthy and colorful narrative, full of slang and foul language; I will summarize rather than reprint it here.  A significant battle was going on, but Fraser’s section was on the flank and had not encountered the enemy.  It was a hot day, and one of the other soldiers found himself very thirsty and naturally wanted a drink.  He was the largest member of the section, and had a nickname that reflected his size.  He asked one of his section-mates to borrow his water bottle, as he could not easily get to his own.  His mate refused, but countered that he would help the first man with his own bottle.  What is significant in this exchange is the fact that the second soldier did not offer to pull the first man’s bottle out of its carrier; instead, he offered to unbuckle his comrade’s carrier from the rest of the webbing.  This exchange was astonishing when I first read it; my assumption that the carrier must have been easier to use in wartime was shattered.  The narrative continues with the troops finding a local well, using their slouch hats attached to rifle slings to bring up water, and adding purification tablets; all that effort was still apparently easier than accessing the water bottle.  It was at that point that the section took fire from the enemy, and Fraser ended up down the well.

This story of unbuckling the water bottle carrier from the brace-ends must not have been an isolated incident, and I have been trying to find other examples.  While I have not found any other narratives, I did find a rather remarkable photograph showing this method.  The picture shows troops from 1st Airborne Division during Operation Market Garden, and was taken near Divisional Headquarters in Oosterbeek.  The photo shows two Airborne soldiers in a slit trench; one is in the act of drinking water, with the water bottle very clearly still in the skeleton carrier.

Water Bottle Market Garden IWM

Operation Market Garden, September 1944.  The man on the left drinking from his water bottle has clearly detached the webbing carrier from the rest of his equipment.  Photo from the Imperial War Museum (BU 1111).

In another part of his memoir, Fraser describes being issued with a canvas water bag for certain patrols.  This water bag was a clever item; it had to be soaked in water prior to use, which would cause the fabric’s fibers to swell and, somewhat counter-intuitively, make the bag water-tight.  This item was called a “chaugle”, derived from the Urdu, but the troops often called it a “chaggle”.  I have only seen references to its use in the Far East, despite its obvious superiority to the enameled water bottle.

Providing clean water to the troops was a logistics challenge even in the best of conditions.  In the deserts of North Africa, fresh water had to be trucked out to the troops on a constant basis; it had to be chlorinated to kill any bacteria and prevent algae from forming during transport.  Even in Northern Europe, where troops could fill their water bottles from the many rivers and streams, it had to be assumed the water was contaminated.  In Fraser’s narrative, he referenced the use of water purification tablets.  These were universally issued regardless of theater, for use when the men had to obtain their own water.  The “sterilizing outfit” was issued as a small tin; inside were two glass bottles.  One bottle contained the actual purification tablets; however, these tablets gave the water an unpleasant flavor that was supposed to be neutralized by the tablets in the second bottle.  I have one of the tins in my collection, but not the glass bottles.  One of each of the tablets was to be dissolved in the water to be treated; shaking the water bottle was supposed to speed up the mixing of the contents.  In Fraser’s story, the soldiers argued whether chewing the pills prior to drinking the well-water would do any good.

sterlizing outfit

The sterilizing outfit:  the two glass bottles go inside the tin.  The “thio” tablets were supposed to counteract the unpleasant taste caused by the sterilizing tablets.  From the collection of the Imperial War Museum (SUR 71).

I feel rather relieved that my personal struggles using the water bottle at living history events seems to be an accurate reflection on historical precedent.  I have occasionally seen fellow reenactors hide modern plastic water bottles inside their basic pouches, but I consider that cheating and bad form.

Sterilizing - Directions

Instructions printed inside the lid of the sterilizing outfit tin.  Author’s collection; this tin is missing the glass bottles.

A note on terminology:  to the British, the item that held water was called a “water bottle”, while the American term for such an item was “canteen”.  In British usage, a canteen was a shop, restaurant, and social club specifically for service members.  As an American who reenacts as British, I believe it is important to use the correct terminology.

Sources

The Pattern 1937 Web Equipment (1939)
His Majesty’s Stationary Office

Brayley, Martin J.
British Web Equipment of the Two World Wars
Europa Militaria:  The Crowood Press Ltd., 2005

Chappell, Mike
British Infantry Equipments 1908 – 80
Osprey Publishing, 1980

Fraser, George MacDonald
Quartered Safe Out Here
First published by Harvill, 1993, republished by Harper Collins, 2000

Kipling, Rudyard
Barrack-Room Ballads
Signet Classics, The Penguin Group, 2003
Originally published 1890